
WordPress is the content management system behind 39.5% of all websites. It’s the dominant website builder because it’s easy to use.
There’s a huge development community behind the platform, it’s free, and you can customize it any way you want.
Figuring out how to install WordPress is the most intimidating part of using it. Beginners and experienced developers need to learn how to install the software using cPanel.
Keep reading to find out what cPanel is and how to install WordPress using it.
What Is cPanel?
Your website and domain name reside on a server. The server is managed and maintained by your hosting company.
That doesn’t mean that the hosting company controls everything. cPanel gives you control over your hosting account.
It’s a web-based user interface that makes these management tasks easy to figure out. You can create email addresses, manage DNS settings, install WordPress files, and manage them.
Installing WordPress Using cPanel
There are a few ways to install WordPress in cPanel. Your specific method depends on your WordPress hosting company.
Most hosting companies offer one-click WordPress installation. Some hosts have this feature available on your hosting account login page.
Another method is to go to cPanel. These instructions assume that you have a domain name and a cPanel login from your hosting provider.
Before you get started, make sure your host offers automatic setup, backups and software updates. It makes maintaining your WordPress installation much easier.
Go into your cPanel account. You’ll scroll down the different categories of apps until you get to Softaculous. You’ll see WordPress along with other CMS apps. Click on WordPress.
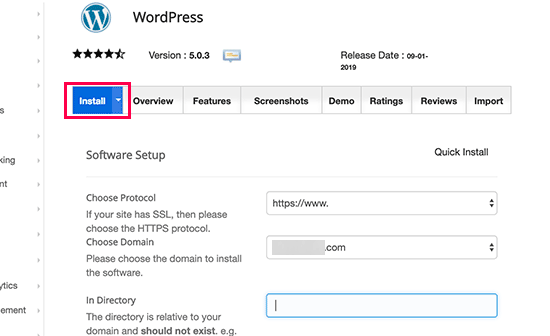
You’ll then choose a protocol (either HTTP or HTTPS) and enter your domain name. You can leave the Directory field blank.
On the next screen, fill in the site settings and create your username and password for your WordPress site. Do not make it easy like “admin” and “12345.” These settings ensure that your install will get hacked quickly.
You’ll be able to choose a WordPress theme to start with. You don’t have to stick with these settings. You can always change them after the installation.
The Softaculous installer goes to work, installing WordPress in your hosting account. You’ll get a notification via email with your site’s information.
Congratulations, you just installed WordPress using cPanel.
Read more: Always keep PrestaShop updated
Configuring WordPress
It’s time to test and configure WordPress. Login to the backend of your site using the link in your confirmation email.
You should be able to log in easily. You can install plugins and new themes to customize your site. The first plugins to install are for security, image compression, and site performance.
Wrapping up:
To set up WordPress using cPanel, begin by logging into your cPanel account. Once logged in, locate the “Softaculous Apps Installer” section, where you can find and select WordPress. Follow the on-screen instructions, providing necessary installation details such as site name and admin credentials. Click “Install,” and within minutes, WordPress will be set up on your hosting server, ready for customization and content creation.